The Filter Wheel
The filter wheel has five positions, one of which (position 0) is always empty. The remaining four positions can hold 2" filters. A selection of broadband and neutral density filters (the most commonly used are the UBVRI filters) are stored at the Nickel 1-m (in a wooden box in the wooden cabinet in the control room). In addition, any of the 2" filters in the 3-m filter library can be mounted in the filter wheel. Please fill out a checkout slip when removing filters from the library and return the filters when your observing run is completed (failure to do so will, in the words of one of our august colleagues, result in infinite bad karma). N.B. The aperture wheel, though part of the same assembly as the filter wheel, is rarely used for direct imaging, but is briefly described below.Loading, Unloading, and Checking Filters
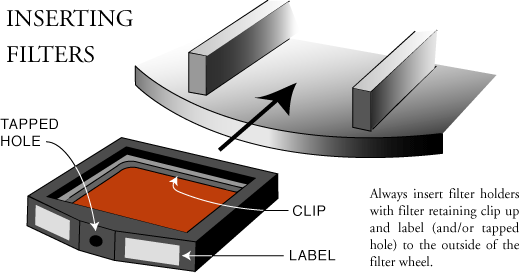
Observers are responsible for checking and/or changing the contents of the filter wheel. The filter wheel is accessed from a panel on the west side of the telescope. You may carefully move the filter wheel by hand to identify which filter is in which of the four numbered slots. Always use the filter handling tool (a threaded aluminum handle kept in the wooden filter box) when inserting or removing filters to minimize the chances of getting fingerprints on the filters. The illustration at right shows the proper orientation for inserting filters into the filter wheel. |
 |
Controlling the Filter Wheel: The Motor Control GUI
The filter wheel is controlled from the Motor Control user interface. This software is started automatically when the data-taking software is started (either from its icon or command dx). To start the motor control interface without starting the data-taking software, either click on the motor control icon or use the command nickel_gui start direct.The motor control user interface is shared with the Nickel Spectrograph; items which apply only to the spectrograph are accordingly grayed out and set to their inactive state. The top bar of the GUI displays the status of the motors: Moving,
Initializing, or an error message. Below this, each motor has a
corresponding row in the GUI; each line has five columns.
Column 1: Active
The top bar of the GUI displays the status of the motors: Moving,
Initializing, or an error message. Below this, each motor has a
corresponding row in the GUI; each line has five columns.
Column 1: ActiveThis column is a button which toggles the motor between active and inactive states, and displays its current state. To be moved, a motor must be in its enabled state (Active Yes). In direct imaging mode, the Filter and Aperture are enabled on startup. You may toggle the states of these two items, and it is, in fact, common to place the aperture wheel in an inactive state for observing, but only once you are certain that it has been initialized and is in the open position (Ordinal Position 0). Once a motor is set to inactive, it will be ignored by the controller. N.B.For direct imaging, the Grating, CCD stage, and Focus motors are not present and should always be disabled (Active No). If any of these are enabled (Active Yes), the controller will attempt to address it the next time you try to move any motor, hanging up and requiring a power cycle of the hardware and restart of the software to restore proper operation. Column 2: Item This column displays the name of the motor. Column 3: Ordinal Position The filter and aperture wheels' positions are numbered 0-4 and 0-7 respectively. Column 3 either reports the wheels' current or requested positions. If the Set Spectrograph and Initialize and Set Spectrograph buttons have gray backgrounds (as in the illustration above), columnn 3 reflects the current positions. If, however, those buttons have a yellow background, at least one of the entries in column 3 is a newly requested position, not yet made current. Clicking either button will cause the instrument to move to the requested position(s) (see desription of these buttons below). To move the filter or aperture wheel to a new position, click on the current oridinal position for the device, and select from the pull-down menu thus invoked. (The pull-down menu may be "torn off" and kept as a separate window.) Click on the now-yellow Set Spectrograph or Initialize and Set Spectrograph to initiate the move. Column 4: Raw PositionColumn 4 shows the current positions of the filter and aperture wheels in terms of stepper-motor counts. Columnn 4 should be regarded as "read only," i.e., you should see these numbers update as you move the motors, but should never have to change their values manually. Column 5: Name Column 5 displays the name of the item (filter or aperture) corresponding to the ordinal position. Observers are responsible for insuring that the names reflect the currently installed filters (apertures may only be changed by staff members). Maintaining accurate naming in the motor control GUI is essential: - The current names, along with raw and ordinal positions, are written to the FITS header of the data images. - An observer may be misled if accurate naming has not been maintained. Because of the potential for mistakes stemming from incorrect or out-of-date naming, all observers should check the contents of the filter wheel against the names in the motor control GUI on the first day of setup, updating the names as needed to correct mistakes and/or reflect their changes to the filterwheel contents. Hg and Ne The Hg and Ne buttons control line lamps for spectroscopy and are not used with the direct imaging camera. Be aware, however, that the lamps are present and connected. Be sure both are OFF, otherwise you will get undesirable stray light in the camera, while needlessly burning up expensive calibration lamps. Set Spectrograph and Initialize and Set Spectrograph These buttons initiate filter and aperture wheel moves. The Set Spectrograph button will make the move relative to the current position, whereas the Initialize and Set Spectrograph button forces the wheel to reread its zero-point fiducial, thus recalibrating itself before moving to the requested position. It is good practice to initialize before the beginning of each night's work, but is generally not necessary again for the remainder of the night, unless you have some reason to believe the wheels have lost track of their proper positions, such as will result from being moved by hand or having their power interrupted. (N.B. There is no harm in initializing as often as you wish, but it does cost a bit more time than a simple relative move). Quit This button quits the motor control GUI but leaves the wheel's positions unaffected. |
The Aperture Wheel
The Aperture Wheel sits above the Filter Wheel and is customarily left in the "open" position for direct imaging. However, you may wish to use one of the two occulting spots (5 and 10 arcsec in diameter) in the aperture wheel to block the light of a bright star at the center of the field. If considering this option, bear in mind that the aperture wheel is not in a focal plane when the telescope is configured for direct imaging. The star will thus be out of focus in the plane of the occulting spot, and will probably not be fully blocked. If occulting a bright source is critical, consider instead using the spectrograph's direct imaging mode, in which the occulting spot is in the telescope's focal plane. Consult a support astronomer for details.Support Astronomers (sa@ucolick.org) Last modified: Tue Jul 17 18:10:30 PDT 2012