CCD User Interface
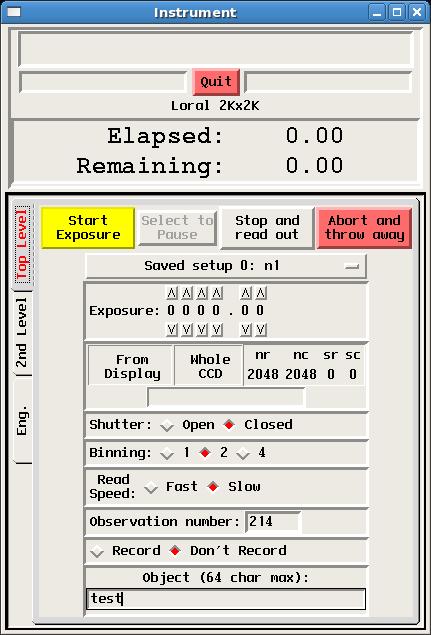
The CCD User Interface (also called the Data-Taker) is started either by clicking on its icon (labeled "Direct Imaging") or typing nickel_direct_client at the Linux command line. The interface consists of those software components for controlling the direct-imaging camera's CCD, including setting array parameters, controlling exposures, and displaying raw images:- The CCD Control GUI, is pictured and described below.
- The XVideo Image Display and associated XVideo Image Control GUI (common to most Lick data-taking systems) are described in a separate manual.

|
The top level of the GUI allows one to set various detector parameters in advance, and to control exposures. Parameters are briefly described here. Commands for controlling exposures - start, pause, stop, and abort - are self explanatory.Immediately below the Quit button is the identification of the CCD. For Nickel direct imaging the chip identification should be Loral 2kx2k. If it indicates another detector, contact a support astronomer for assistance.Note that if you Quit the data-taking GUI while an exposure is in progress, the exposure will be aborted and the data lost. Also, only one copy of the data-taking software may be running at a time. If you attempt to start a second copy, a warning will appear asking if you want to stop the existing software and start a new copy. If you respond yes to this query while an exposure is in progress, that exposure will be aborted and the data lost. Saved Setup Parameters are stored as one of ten "saved setups." No active "save" is required to make current parameters part of a saved setup, instead, current parameters automatically become part of the currently active saved setup. Saved setups may be named on the 2nd level of the GUI (see below). Exposure Time Zero-second exposures and fractional seconds are allowed. Due to shutter timing errors and fly time, open shutter exposures of less than 3 seconds for photometry data are not recommended. CCD Window This is the section of the CCD which is atually read out. Smaller windows read out more quickly. The window size may be defined graphically from the image display (using the XVideo b command to define the region), or by entering rows, columns, and origin. Clicking "Whole CCD" restores readout of the whole chip. Note that the XVideo display origin is the upper left hand corner of the image. Shutter Open for normal exposure, close for darks and bias frames. Binning CCD2 is generally used binned 2x2 for normal observations (see Detector Characteristics). Read Speed Fast is about half the time of slow, gained at the price of a slight increase in readnoise (see Detector Characteristics). Observation Number and Recording The observation number increments with each recorded exposure. It can be set manually, but be careful, it is possible to overwrite existing data by setting the number back. Note that the last unrecorded exposure is saved in /scratch/nickel/scr.fits. More on recording images in "2nd Level", below. Object You may enter up to 64 characters, including white spaces. The string will appear in the "OBJECT" field of the FITS header. |

|
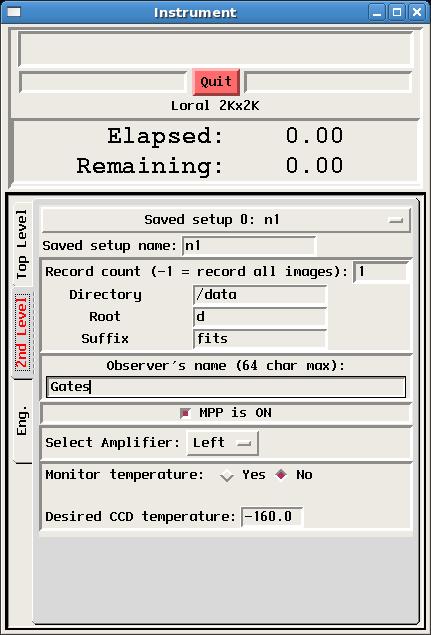
Clicking on the 2nd level tab on the GUI's left margin presents parameters that are usually only set once in the course of a night, if at all. Only the first few of these are for observer use. MPP and Amplifier selection should remain as set by default, unless there is a clearly understood reason to change them.Saved Setup Name This allows a name to be associated with a saved setup (see Top Level).Record Count Whether an image is recorded or not is controlled from the Top Level by turning recording on of off. The record count parameter is generally set to 1 or -1 so that all images are saved whenever recording is turned on. Directory This parameter should be set to /data so that recorded images are saved in the /data directory. It is important to save them there so that they will be found and saved to Lick's on-line data archive, http://mthamilton.ucolick.org/data/. Data are copied to the archive shortly after being acquired. If you need to set or reset your data archive password, please contact a Support Astronomer. If there are data from the previous observer's run, contact a Support Astronomer or Telescope Technician who will make sure that data are properly archived before clearing the directory for you. Data files can be overwritten, so either don't record images or make sure observation numbers are different from those of existing data to make sure data aren't overwritten accidentally. Root The string entered here becomes the root of the image file names, prepended to a unique image number. E.g., using the parameters shown here, the first recorded image will become /data/d1.fits, the second d2.fits, and so on. The root may be whatever you wish, but we recommend you use the default "d" root. Suffix You may choose the suffix to be appended to your image file names, but it must be one recognized by our automatic archiver: fits, ccd, fts. Observer's Name You may enter any number of first or last names up to a total of 64 characters. White space and comma separation are permitted. The string will appear in the "OBSERVER" field of the FITS header. |
Support Astronomers (sa@ucolick.org) Last modified: Fri Feb 28 11:48:37 PST 2014