UNIVERSITY OF CALIFORNIA OBSERVATORIES / LICK OBSERVATORY


Gemini Setup Checklist

Last update 5 April 2008

Topics:
Cooling Down Gemini
Vacuum Pump
Recharging Helium in Compressor
Mounting on Telescope
Computer Configuration
Software Startup
Telco
Warming Up Gemini
Labeled Instrument Photos


Cooling Down Gemini

Start at least 2 days before instrument goes on telescope, preferably start 3 days before

Pertinent Instrument Photos: Gemini Front View, Vacuum Guage, Vacuum Pump, Helium Compressor Front, Cold Head, Lakeshore Temperature Controller, Helium Compressor Back

  1. Plug in and turn on Gemini power strip.
  2. Make sure motor drivers are turned OFF.
  3. Plug in pressure gauge (both coax and pinned connector, and power outlet of course). If pressure less than 5e-2 torr, then do not need to put on vacuum pump, but usually a good idea to pump on Gemni during cooldown anyway.
  4. Put Gemini on vacuum pump. See Vacuum Pump below.
  5. Pump until at least down to 5e-2 torr (more vacuum is good - can't over pump it)
  6. Shut down vacuum pump in opposite order of start up (you can stop pumping at this point or pump during cooldown).
  7. Plug Helium Compressor (CCR) into 220V plug (make sure compressor power switches are off before plugging in - they are often left on because the dome crew just unplugs it at the end of the run).
  8. Connect CCR to Gemini
    A. Electrical cable
    B. Hoses: supply to supply, and return to return
  9. Recharge helium in CCR if necessary (e.g. if static pressure of helium in CCR is below 250 psi).
  10. Start filling Gemini with LN2 (must be started by morning 2 days before it goes on telescope)
  11. Set temperature to 28K on Lakeshore temperature controller. Top LED display is temperature readout, bottom display is the temperature setpoint. To set temperature, push the setpoint button and then the arrow keys until you get to the desired temperature.
  12. Set heater power to low on Lakeshore temperature controller. Push heater button until display shows low.
  13. Turn on power to CCR
    A. Turn on Compressor
    B. Turn on Cold Head
  14. Keep filling Gemini with LN2 for the next 48 hours according the following schedule:
     hours 1-2, fill every 20 to 30 minutes
     hours 3-6, fill every 45 minutes to 1 hour
     hours 7-12, fill every 2 to 3 hours
     hours 12-24, fill every 4 to 6 hours
     hours 25-48, fill every 6 hours
    
     Note: every cooldown is different, fill more often if necessary
    
  15. Fill with LN2 every 8 to 12 hours while on telescope.
  16. Shut down vacuum pump in opposite order of start up if pump still running (I usually stop pumping when the pressure gets down to at 4e-7 torr on the vacuum gauge).
  17. Disconnect vacuum gauge and coil wires out of the way (typically they get carefully wrapped around the vacuum valve).

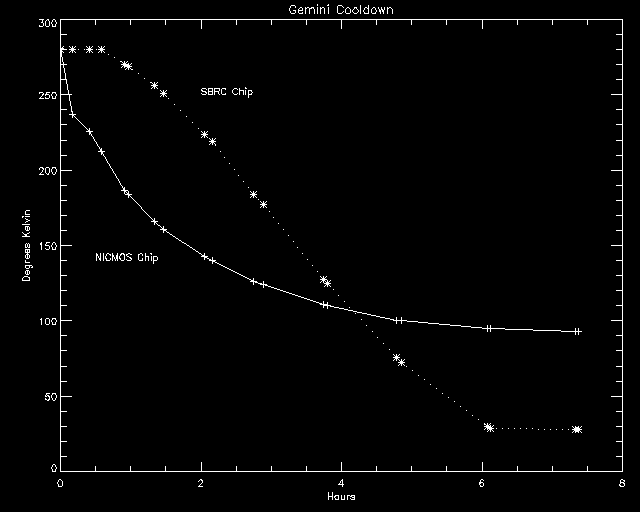
The plot below shows the approximate temperature of each chip as a function of time when filling Gemini according to the schedule listed above. The SBRC temperature is the temperature shown on the Lakeshore controller. The NICMOS temperature is the temperature shown on channel 2 of the blue temperature gauge. If Gemini cooldown is going significantly slower than the plot indicates it should, even after filling more frequently, check to be sure that the motor drivers are turned off. These can generate a great deal of heat and prevent the instrument from reaching the desired temperature.


Vacuum Pump

We are now using the new (June 2002) turbo vacuum pump instead of the old vacuum pump described in the brown text. The old directions will remain here just in case the new pump is unavailable (e.g. broken so badly that there is no hope of using it within the next 24 hours).

The turbo vacuum pump is very easy to use:

  1. Hook up vacuum pump hose to Gemini's vacuum valve.
  2. Make sure all valves are closed.
  3. Turn on vacuum pump (and also the vacuum gauge, if desired).
  4. When the green LED turns on, slowly open the turbo pump valve. The green LED should turn off and the pump will go into roughing mode.
  5. When the green LED turns on again, slowly open Gemini's valve.
  6. Pump on Gemini until the vacuum is as least 1e-3 torr. I usually pump until the vacuum is less than 5e-7 torr.
  7. Close Gemini valve.
  8. Close turbo pump valve.
  9. Turn off vacuum pump and carefully disconnect the vacuum hose. (Please replace the nozzle that usually is attached to the Gemini vacuum valve).
  10. I usually leave Gemini's vacuum gauge attached until just before mounting on the telescope so that the pressure can be properly monitored as long as possible.

Pertinent Instrument Photos: Vacuum Pump, Vacuum Pump Inside

  1. Plug in.
  2. Make sure Multiplier is Off, Toggle switch is Off, and Gauge Selection is on Pressure.
  3. Close Throttle Valve (cw).
  4. Open Pump Isolation Valve (ccw).
  5. Turn on Power Switch.
  6. Wait for quiet forepump (about 2 minutes).
  7. Turn on Diffusion Pump Switch.
  8. Wait 15 minutes wile pump heats to operating temperature.
  9. Slowly but completely open Throttle Valve (ccw).

Recharging Helium in Compressor

Pertinent Instrument Photos:
Helium Compressor Front
  1. Get helium tank to compressor.
  2. Attach regulator (with copper fill line) to tank.
  3. Uncoil copper line until it will reach fill nozzle on back of compressor (close to pressure gauge). Be careful when uncoiling because the copper tube has kinks in it. Try not to bend them more than necessary.
  4. Unscrew the nozzle cover on the compressor.
  5. This is the important part-there are four valves:
  6. Make sure the tank valve is closed and the regulator valve is set to zero psi.
  7. Open the flow valve.
  8. Open (CCW) the tank valve. One turn should open fully.
  9. Open the regular valve (CW) so that gas starts flowing (20 or 30 psi is plenty for this stage).
  10. Let gas flow to clean out lines. You can loosely attach it to the compressor nozzle so the nozzle is flushed out too. Flush for 30 seconds or more.
  11. Tighten copper hose onto nozzle with gas still running.
  12. Open regulator valve (CW) until regulator gauge reads > 275 psi. You may have to tighten the compressor nozzle fitting if it starts to leak (hiss).
  13. Slowly open compressor valve (CCW) and watch compressor gauge until needle gets to 250 psi (if compressor is running, then fill to 270-280 psi). Do not over fill the helium compressor. If you put in too much helium, you will have to bleed it off to get back down to 250 psi (or 270-280 psi if compressor is running).
  14. Close compressor valve (CW), flow valve (CW), and tank valve (CW) in that order.
  15. Disconnect at compressor nozzle and put on nozzle cover.
  16. Decrease regulator valve pressure (CCW) to zero psi.
  17. Open (CCW) flow valve to release pressure in the regulator.
  18. Close (CW) flow valve.
  19. Remove regulator from tank and replace cover over tank valve. Note: You might want to leave the regulator on the tank in case this has to be done again. I wouldn't bother until it gets close to 200 psi.

Mounting on Telescope

I. Mechanical

  1. Put triangle with Gemini mounting flange on TUB.
  2. Make sure TUB is rotated to 90.
  3. Mount Argon line lamp on inside south end of triangle. There are a few screws that hold it in the proper position.
  4. Attach compressor mount to telescope base.
  5. Attach 19" rack to telescope base.
  6. Add platform extenders to forklift.
  7. Move Gemini and compressor from prep room to dome floor. You may have to turn off the compressor and disconnect the hoses and electical power from the cold head to get it through the door. Reconnect and turn on CCR ASAP so Gemini doesn't warm up to much (no more than 10 minutes with the CCR off).
  8. Remove Gemini lens cover.
  9. Roll Gemini onto lift platform. Secure with angle iron bar and clamps (raise platform a few inches so can attach clamps).
  10. Put CCR on orange hydraulic lift.
  11. Raise lift and hydraulic lift at same time.
  12. Align Gemini with bolt holes and raise slowly. Bolt to telescope.
  13. Release Gemini from trolley and lower trolley away.
  14. Attach blue temperature gauge to side of Gemini, facing downwards.
  15. Transfer CCR to lift from hydraulic lift.
  16. Raise and attach CCR bungy cable to shackle at end of steel beam.
  17. Tie CCR hoses with cord so that they are horizontal.
  18. Install CCD Power Supply crate in 19" rack on telescope.

II. Electronic

  1. Plug argon lamp into Spare1_110SSR outlet of line lamp controller..
  2. Plug Gemini power strip into the UPS (may need an extension cord).
  3. Thread gray PC-Transputer (PCT) cable through loop on TUB, eye-bolt on telescope fork, behind telescope control console and through cable entry hole to the 120" ROR.
  4. Connect PCT cable military connector to Transputer crate on Gemini (labeled PC Link).
  5. Connect cables from CCD Power Supply to Gemini (six cables in black braided cable wrap, labeled A-F at Gemini end, SBRC A-C and NICMOS D-F at other end).
  6. Plug CCD Power Supply into Gemini power strip.
  7. Strain relieve all cables.
  8. Turn on instrument:
    1. CCD Power Supply
    2. Transputer Crate
    3. Motor Control Transputer
    4. Motor Drivers (only turn this on if software will be started immediately!)

Computer Configuration

  1. Set up Gemini computer with its 2 monitors. Small monitor should be plugged into video port 1, large monitor into video port 2. Plug in all components to power strip on UPS.
  2. The serial port connects to Lantronix port 5. (This is necessary for telescope dithering from Gemini software as well as getting RA, Dec, and HA from Telco for the FITS Header.)
  3. Connect PCT cable to parallel port (other parallel port should be taped over). (This is the main data connection between the instrument and PC.)
  4. Connect ethernet cat-5 cable to ethernet card.
  5. Turn on monitors and boot computer.

Software Startup

  1. Log into shard and start shane_serial program.
    /usr/local/lick/etc/init.d/shane_serial start
  2. Turn on Motor Drivers if not already on.
  3. On Gemini PC start software by typing gemini /licktcs
    Do Not Initialize Motors when starting software!
  4. Initialize the following motors from Engineering menu (Motor Init function).
    1. SW Filter
    2. LW Filter
    3. FP Aperture Wheel
    4. Aux Aperture Wheel
    5. Dichroic
  5. Take test exposures: press CTRL-F4 to take test exposures in the following modes.
    1. Observation setup: 1s exposure, CDS mode with Blank filter in each channel. Should look like bias images on http://mtham.ucolick.org/techdocs/instruments/gemini/gemini_testing.html
    2. Change to J and K' filters (A and B channels respectively) and do 10s CDS exposures. Should look like the flat fields on http://mtham.ucolick.org/techdocs/instruments/gemini/gemini_testing.html
  6. Test moving the telescope from Gemini software:
    1. Turn on telescope power
    2. Press CTRL-F1
    3. Enter 10 arcsec Dec move
    4. Watch telescope position to make sure telescope moved.
  7. If exiting the software or not using Gemini for more than an hour, be sure to turn off Motor Drivers.

Telco - OLD! using POCO now (which uses shane_serial on shard)

  1. Start Telco_serial on shane if not already running
    /usr/local/lick/etc/init.d/telco_serial start
  2. Start Telco menu program on shane
    telcontrol cass
  3. Set Guide Matrix to default cass matrix (---+).

Warming Up Gemini

  1. Stop filling with LN2
  2. Turn off Motor Driver
  3. Turn off Motor Controller
  4. Turn off Transputers
  5. Turn off CCD Power Supply
  6. Turn off CCR
    1. Turn off Cold Head power
    2. Turn off Compressor power
  7. Set temperature on Lakeshore controller to 295K